Stop Turnout & Double-Slip Switch Derailing
While turnout derailing is common among model trains, the light weight of Z-scale rolling stock makes them that much more susceptible. The good news is that this is easily remedied with some gentle massaging of these small mechanisms.
To complete these repairs, you'll need a rotary tool (such as a Dremel) with a Dremel #425 polishing wheel (mounted on a Dremel #402 mandrel). The 425 wheel allows you to do very gentle grinding of the rails and other metal surfaces, without removing too much material. It also leaves a nice shine and a smooth surface, which is perfect for our purpose (hint: it's also good for cleaning really dirty track). If you don't have a rotary tool, a very small file will suffice. You'll also need some CA glue or 6-minute epoxy. If you're modifying a double-slip switch, you'll also need a Dremel tool with a tiny diamond bit or a small file with a fine point.
One note about straight and curved turnouts, as well as double-slip switches: it's best to allow them to "float" on your layout. There's a reason Marklin doesn't include holes for track nails in their turnouts; if you don't nail or glue your turnouts to your layout, they are less likely to be distorted by uneven roadbed. A distorted turnout will not only function poorly (or more poorly as the case may be), but derailments will be more likely as well. On my layout, I have fastened only the adjoining track; the only thing holding the turnouts down (besides the rail joiners) is the ballast, which is applied passively; that is, the ballast exerts no force on the turnouts, and has little adverse effect on their performance.
Note that the following procedure involves modifying some of the more expensive pieces of Z track available, so caution is always advised. If you have nonfunctional spares to practice with, all the better.
In this article:
See also:
Feel free to write me if you have any additions or corrections to this page.
Turnouts
There are three common trouble spots in Marklin straight turnouts (8562, 8653, 8565, and 8566) that can cause locomotives to stall, and rolling stock to derail.
The following also applies to Marklin curved turnouts (8568 and 8569).
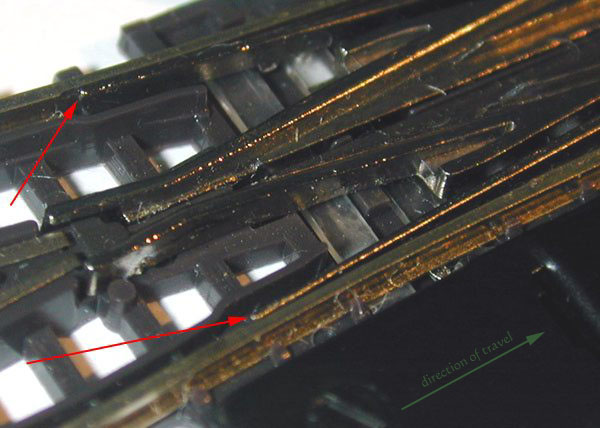
Click on any orange area in the photo to enlarge.
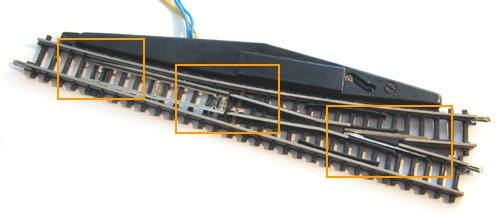
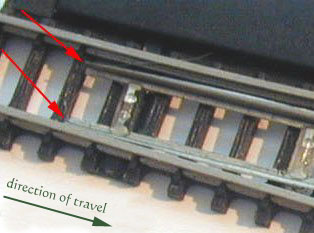
Using the Dremel #425 (see above), gently grind down the insides of the tips of the points so that the tips are tapered instead of square. If the points stick up higher than the surrounding rails, grind a little off the tops of the points as well.
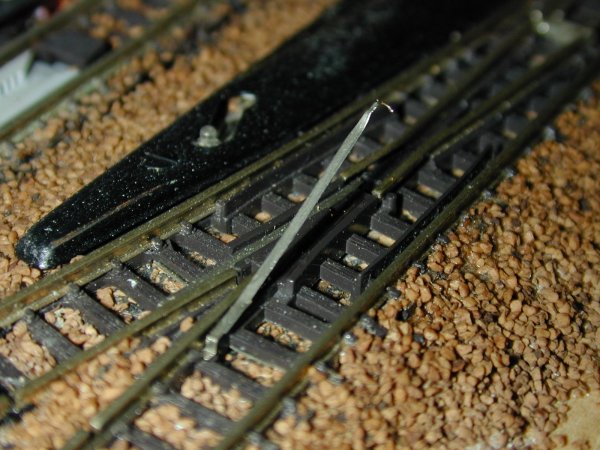
Starting with the tip currently touching the rail, grind the tip just a little, and then slowly push a car (longer cars with moving trucks are preferred, as they are more susceptible) in the direction of travel noted in the closeup across the turnout. If the wheels jump at all, grind a little more. When you're done, throw the switch and do the same for the other tip.
Make sure not to grind too much, less is more. It's also imperative that you don't grind the outsides of the points (the parts that touch the rails); if you do, the turnout may not serve its function.
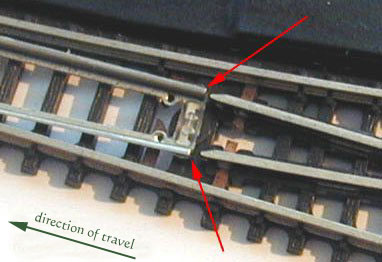
Using the Dremel #425 (see above), gently grind down the tops of the points at the pivot. You may have to hold the other ends of the points to keep them from shaking.
Starting by grinding just a little, and then look at the turnout from the side (bend down if it's mounted on a layout). You can also test it by running your fingers over the layout and checking for any protruding edges. If the pivot side of the points is not flush with the tops of the surrounding rails, keep grinding, making sure to create a nice, short taper down the points.
To solve this problem, use a tiny bit of CA glue or 6-minute epoxy (and I mean a tiny bit) to hold down the contacts. Now, the springiness of these contacts is intentional, as it ensures contact with the wheels of locomotives; in my experience, though, gluing hasn't noticeably affected performance.
 The easiest way to do this is to put the glue on a piece of paper or in a mixing cup, and apply a tiny drop between one of the contacts and the plastic underneath with a pin or X-Acto blade.
(Don't use too much glue here; a little goes a long way.)
Hold down the contact with a flat-blade screwdriver for a sufficient length of time for the glue to dry.
When you're done, repeat for the other contact (don't try to do them both at once).
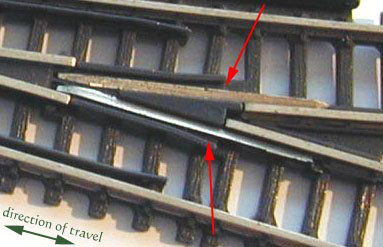
The photo to the right shows one of these contacts that has actually come loose (from continuous use), which can, obviously, cause problems.
The easiest way to do this is to put the glue on a piece of paper or in a mixing cup, and apply a tiny drop between one of the contacts and the plastic underneath with a pin or X-Acto blade.
(Don't use too much glue here; a little goes a long way.)
Hold down the contact with a flat-blade screwdriver for a sufficient length of time for the glue to dry.
When you're done, repeat for the other contact (don't try to do them both at once).
The photo to the right shows one of these contacts that has actually come loose (from continuous use), which can, obviously, cause problems.
Double-Slip Switches & Crossovers
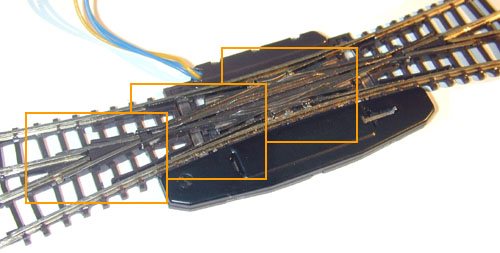
There are three common trouble spots in Marklin double-slip switches (8560) that can cause rolling stock to derail.
The third (see below) also applies to Marklin crossovers (8559).
You'll notice similarities with the solutions for turnouts, above.
Click on any orange area in the photo to enlarge.
To solve this problem, use a tiny bit of CA glue or 6-minute epoxy (and I mean a tiny bit) to hold down the contacts. Now, the springiness of these contacts is intentional, as it ensures contact with the wheels of locomotives; in my experience, though, gluing hasn't noticeably affected performance.
The easiest way to do this is to put the glue on a piece of paper or in a mixing cup, and apply a tiny drop between one of the contacts and the plastic underneath with a pin or X-Acto blade. (Don't use too much glue here; a little goes a long way.) Hold down the contact with a flat-blade screwdriver for a sufficient length of time for the glue to dry. When you're done, repeat for the other three contacts (don't try to do them all at once).
Using the Dremel #425 (see above), gently grind down the insides of the tips of the points so that the tips are tapered instead of square. If the points stick up higher than the surrounding rails, you can grind a little off the tops of the points as well.
Starting with the tips currently touching the rails, grind the tip just a little, and then slowly push a car (longer cars with moving trucks are preferred, as they are more susceptible) in the direction of travel noted in the closeup across the turnout. If the wheels jump at all, grind a little more. When you're done, repeat the process for the other three points.
Make sure not to grind too much, less is more. It's also imperative that you don't grind the outsides of the points (the parts that touch the rails); if you do, the double-slip switch may not serve its function.
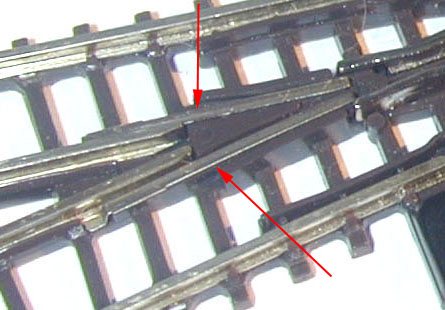
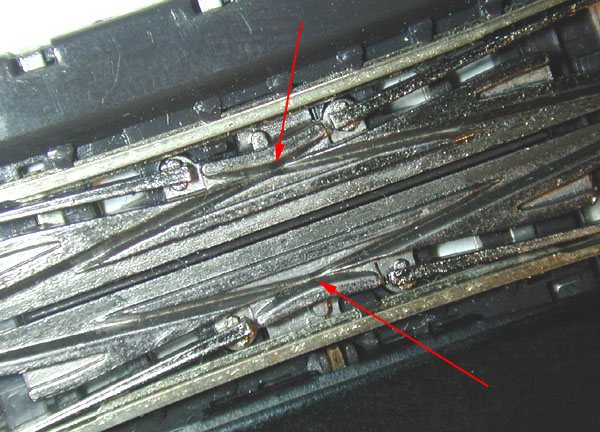
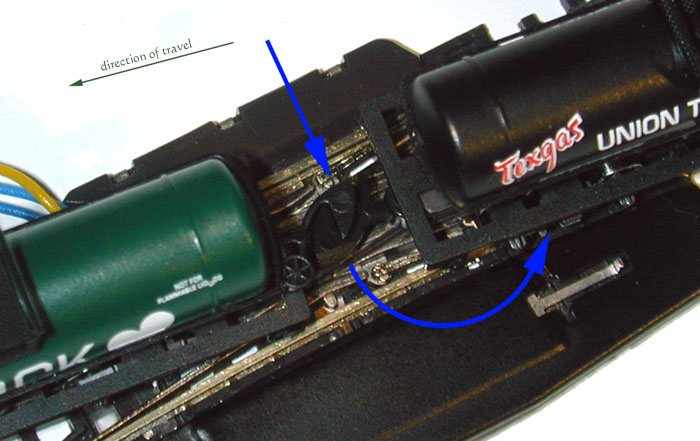 Here's what's happening:
The couplers have springs that hold the couplers together; those springs exert forces against one-another in a direction roughly perpendicular to the direction of travel.
In the photo (click to enlarge), the coupler in the green car is exerting a force in the direction of the first blue arrow.
Normally, the coupler in the black car exerts an equal and opposite force, and all goes well.
However, over this portion of the crossover, the truck in the black car is lifted up, and since it can no longer sustain the opposing force, it begins to turn, as shown by the second blue arrow.
(For you engineers out there: the two springs create a moment in the truck of the black car about the truck's pivot.)
Hence, the black car is derailed.
Here's what's happening:
The couplers have springs that hold the couplers together; those springs exert forces against one-another in a direction roughly perpendicular to the direction of travel.
In the photo (click to enlarge), the coupler in the green car is exerting a force in the direction of the first blue arrow.
Normally, the coupler in the black car exerts an equal and opposite force, and all goes well.
However, over this portion of the crossover, the truck in the black car is lifted up, and since it can no longer sustain the opposing force, it begins to turn, as shown by the second blue arrow.
(For you engineers out there: the two springs create a moment in the truck of the black car about the truck's pivot.)
Hence, the black car is derailed.
To remedy the situation, you'll need a Dremel tool with a tiny diamond point (I don't have a Dremel # for this one) or a small file with a fine point. (Don't use a cutting disk or the 425 polishing disk, as both of these are too thick.) Gently deepen the groove, making the sides a little less tapered. Be careful not to increase its width or change its direction. Do your grinding in small increments, repeatedly testing the results with a two tankers or similar cars.
Once you're done grinding, use a file or 220-grit sandpaper to polish the contact.
Return Home | Search | Contact Me
Copyright © 2000-2010 D. A. Karp. All rights reserved.