Reviving Marklin Locomotives
Every Marklin Z-scale locomotive should run smoothly, quietly, and reliably. If it doesn't, the problem can almost always be fixed. In most circumstances, one can revive a poorly-running or non-functioning Marklin Z locomotive in under three minutes.
In order for an electric locomotive to work, electricity must flow uninterrupted from the tracks into the motor, and the rotation of the motor must be freely transferred to the wheels. Here's a simple breakdown of the flow of energy that causes a Marklin Z engine to run:
You'll probably only need to tend to one or two of these areas if you're trying to diagnose a specific problem (see following section). If you're trying to improve the overall performance or reliability of a specific engine, however, you'll want to examine each of these areas to eliminate anything that could be inhibiting smooth running. Either way, the solutions to various problems are explained later in this article.
|
First thing to try Having trouble getting an engine to run properly? To find out if the problem is the engine or the track, find a standard 9V battery, and while holding the engine in your hands, touch the terminals to the wheels (one terminal on the left wheels and one on the right). If it runs well, then the problem is your track, wiring, or power pack. If it doesn't run well, your engine needs reviving, so read on! |
In this article:
Feel free to write me if you have any additions or corrections to this page. Click on any photo to see more detail.
Diagnosing Engine Problems
Here are some common Marklin Z locomotive problems and their causes. See the following sections for solutions to some of the problems.
| Diagnosis | Possible Causes/Remedies |
| Engine seems to run fine in spurts, but jerks or even stops dead on the tracks | dirty track* |
| Engine seems to run fine in short spurts, but jerks constantly, regardless of track | dirty wheels (details) |
| Engine runs slowly until it "warms up" | congealed oil - moving parts must be cleaned and oiled |
| Engine gets hot after only a few minutes of running | congealed or insufficient oil - all moving parts must be cleaned and oiled |
| Engine runs very slowly, even when "warmed up" | brushes need to be replaced, copper contacts need to be cleaned |
| Engine runs better in one direction than the other | pushrods are misaligned and binding with gears (common in small diesel and steam engines) - remove pushrods and reassemble |
| Engine runs well, but then gets jammed for no obvious reason | foreign particle in gears, pushrods on steam engine out of alignment, possible track problem |
| Engine runs well, but is noisy | insufficient oil on gears, tension on brushes too high |
| Engine doesn't run or runs very slowly, and one or both trucks pivot upward when power is applied | congealed oil on the kingpin (details), congealed oil in the gears in the trucks |
| Engine doesn't run at all, lights are on, and the motor just hums | heavily congealed oil - moving parts must be cleaned and oiled |
| Engine doesn't run at all, lights are on, and no sound is heard from the motor | all moving parts should be cleaned and oiled. If that doesn't help, motor contacts are misaligned or broken, brushes need to be replaced, or motor needs to be replaced. |
| Engine doesn't run at all, lights are off, and no sound is heard from the motor | motor contacts are misaligned or broken, one or more wires (Crocodiles only) are broken, power switch (electrics only) is set to 'catenary', possible electrical short |
| Engine runs, but lights are off | lights need to be replaced, light contacts are misaligned or broken, trucks are reversed |
| Engine runs, but only after manually 'nudging' the motor armature | bad brushes, dirty motor contacts, heavily congealed oil, possible bad motor |
| Engine doesn't run, and smoke is seen or a sizzling sound is heard from the engine - placing on tracks stops other engines on same circuit | electrical short: fried motor, foreign object between brushes and commutator, motor contacts are touching. Test motor by removing it and attaching directly to power; try replacing the brushes |
| Engine doesn't run after replacing 3-pole motor with 5-pole motor | wrong brushes: 3-pole and 5-pole brushes are different (details) |
| Engine runs backwards (compared with other engins) | trucks are reversed |
| Directional lights operate backwards | trucks are reversed AND motor is upside-down (flip it over) |
| Leading wheels on steam engine (or Crocodile) derail easily | Check track, and make sure leading wheels are correct distance apart (check gauge). Resist urge to add a spring. |
|
*A Word About Dirty Track You may notice that some locomotives suffer more greatly from this problem than others. The reason is not due to a problem in the locomotive, but rather that some locomotives (such as steam engines) are more susceptible to this problem than others (such as electric and diesel engines). To make any locomotive less susceptible to dirty track, you can improve the electrical pickup - see Improving Locomotive Power Pickup for details. You'll also, of course, need to keep your track and wheels clean - see Cleaning Z-Scale Track and Cleaning Locomotive Wheels, respectively, for details. |
If you need to replace the motor brushes, refer to the instruction sheet that accompanies your engine, check a recent Marklin catalog, or refer to this table for part numbers. Nearly all other problems can be solved by cleaning something.
If your engine repeatedly encounters the same problem on the same portion of track (stopping, derailing, etc.), it's the fault of the track, not the engine. If it's at a turnout or crossing, see Stop Turnout & Double-Slip Switch Derailing. Otherwise, the problem might be poorly-aligned track, damaged track, a gap in the rails, a build-up of dirt or corrosion, or even a foreign obstruction, such as ballast or a little plastic person.
Getting Spare Parts
To get spare parts for your Marklin locomotive, first determine the model number of your engine.Don't know the model number? Here are some some ways to find out:
Once you have the model number, look it up on the official Märklin.com website:
Märklin.com Spare Parts ListsFind your locomotive in the list and click Show to view all of the available parts for it. Can't find your model in the list? Try a similar model (88290 instead of 88291 or 88292).
Tip: Also available is this motor upgrade table, which lists the part numbers for 3-pole motors, 5-pole motors, and respective replacement brushes for nearly all Marklin locomotive models.
Once you have the right part number, contact any authorized Marklin dealer to order the parts.
Alternatively, if you need more than a few parts, it may be quicker (and cheaper) to buy a complete replacement engine on eBay; even if the engine is in bad shape or is nonfunctional, it can be a treasure trove of spare parts!
Cleaning and Lubricating Your Locomotive
Whether you've inherited a 20-year old engine from your great uncle, acquired a second-hand engine on eBay, or purchased a brand-new engine from your local hobby shop, you'll need to oil it before you run it. The tiny instruction sheet that comes with all Marklin engines gives little more than a few hints on regular maintenance, but it's a good place to start. These instructions should get any engine running perfectly in under three minutes.
You'll need a pair of tweezers, a tiny slotted screwdriver, and some suitable oil.
|
A Word About Oil Labelle #108 oil (available in most hobby shops) is probably the best oil for these tiny engines. The Labelle bottle and needle applicator are very convenient, as well as resealable; the oil is thin and doesn't harden. Marklin and Seuthe both make locomotive oil as well, but their applicators are much less convenient, and the high viscosity of their products is more suitable for HO scale engines. Most other types of oils are probably not suitable.It has been suggested that toothpaste be used as a lubricant, but given that it hardens rapidly, is actually an abrasive, and is a food product that can smell and attract ants, I really wouldn't recommend it. Lithium grease (commonly used in R/C cars) is the lubricant of choice for plastic-geared engines, like those made by Micro-Trains and Rogue Locomotive Works (GP38 only). |
How much oil should you use? If you don't use enough, all of the surfaces that need lubrication won't get it. If you use too much, you increase the liklihood of dust and dirt sticking to the oil and getting into the gears. The nice thing about oil is that, when applied, it tends to wash accumulated dirt away. To help keep dirt from building up in your locomotives, store them vertically (on their wheels) so that the oil will drip down to the wheels, rather than accumulate in the motor or locomotive shell.
While Marklin has produced over 200 different Z-scale locomotives in the nearly thirty years Z has been around, there are really only a few basic chassis designs. Since effective engine cleaning and lubricating involves disassembly, it's easiest to break down this section by chassis type. There are four basic categories of locomotive chassis (click on any photo to enlarge):
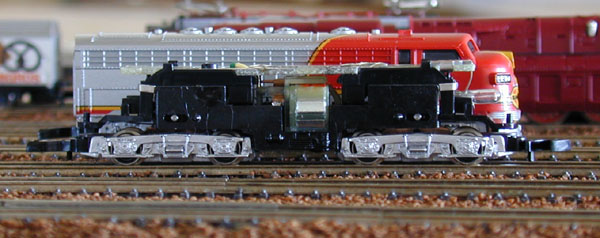
BIG DIESELS AND ELECTRICS
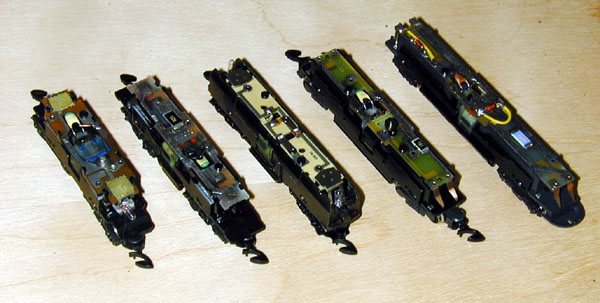 The first and most common type of locomotive chassis is what is used for nearly all diesel and electric engines.
The variations differ slightly in size, features, and number of wheels, but all have two semi-enclosed trucks (bogies), a centrally-mounted motor, a circuit board on top, and a plastic, snap-fit shell.
The first and most common type of locomotive chassis is what is used for nearly all diesel and electric engines.
The variations differ slightly in size, features, and number of wheels, but all have two semi-enclosed trucks (bogies), a centrally-mounted motor, a circuit board on top, and a plastic, snap-fit shell.
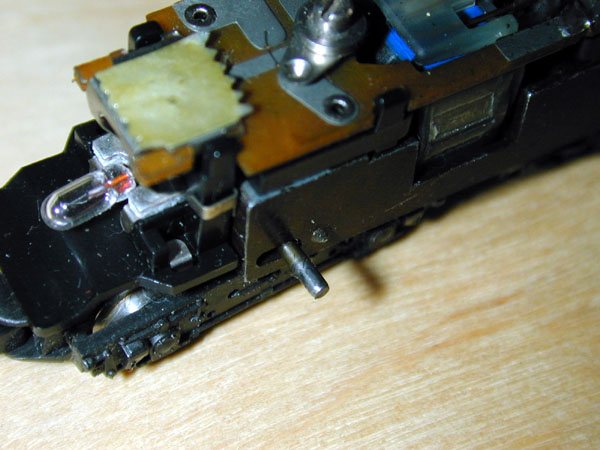 The kingpins serve two purposes: they connect the trucks to the chassis, allowing the trucks to pivot freely, and they serve as the axle that holds the spur gear, which transfers torque from the worm gear on the motor to the gears in the truck.
The first step is to remove one of the kingpins by pushing one end through with one tip of a pair of tweezers. If it sticks at all, then you've just found a major source of the problem.
Note: it's best not to remove both trucks at once.
They're not interchangeable; if inadvertently switched, the locomotive will run in the wrong direction.
Hint: if your engine runs backwards (not in the same direction as your other engines), switching the trucks will solve the problem.
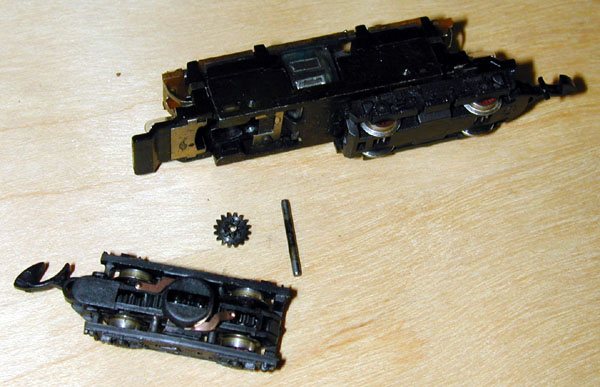 Once the kingpin is out, the truck can be easily pulled off.
The photo shows the spur gear removed, but you might as well leave it in for now.
Once the kingpin is out, the truck can be easily pulled off.
The photo shows the spur gear removed, but you might as well leave it in for now.
Douse all of the gears and axles in the truck with Labelle #108 oil, making sure to squirt a drop in the kingpin/spur gear hole (the applicator needle on the Labelle bottle is the perfect size for this).
Using a liberal amount of oil here will improve performance, but may cause the unit to pick up more dirt later on.
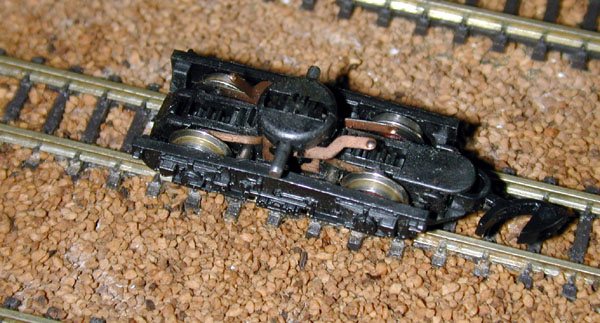 Insert the kingpin back into the kingpin hole on the truck (but leave the truck off the chassis).
Place the truck on the tracks, and roll it back and forth quickly and repeatedly until all of the wheels and gears are spinning smoothly and quietly.
Insert the kingpin back into the kingpin hole on the truck (but leave the truck off the chassis).
Place the truck on the tracks, and roll it back and forth quickly and repeatedly until all of the wheels and gears are spinning smoothly and quietly.
Repeat steps 1-5 for the other truck.
If you still encounter problems and suspect dirt in the engine or poor lubrication (see the diagnosis table, above), it's likely that one truck is the culprit. Try removing only one of the trucks, and, while supporting the engine with your fingers, place it on powered track. If the engine still exhibits the problem, it's likely to be caused by the truck still attached to the chassis; reattach the first truck and remove the second, and try again.
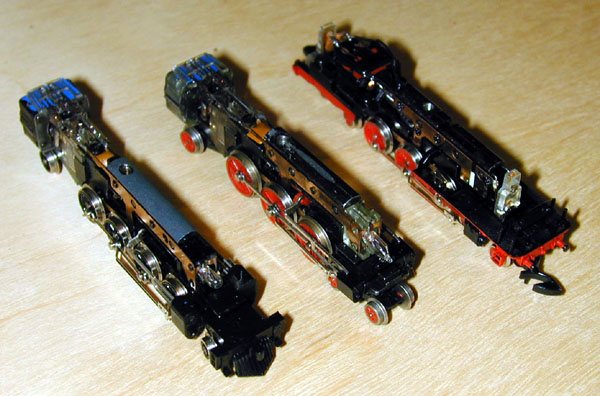 All large Z-scale steam engines have a similar design: a horizontal motor mounted to the rear of the chassis, a single row of drivers, running gear, and a metal body mounted with a single screw.
Differences include the number and size of the driving wheels, the number of leading and trailing wheels, and whether or not there's a tender.
Here's how to clean and lube them:
All large Z-scale steam engines have a similar design: a horizontal motor mounted to the rear of the chassis, a single row of drivers, running gear, and a metal body mounted with a single screw.
Differences include the number and size of the driving wheels, the number of leading and trailing wheels, and whether or not there's a tender.
Here's how to clean and lube them:
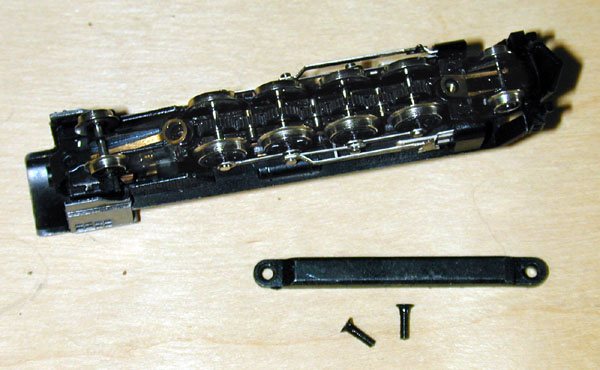 Access to the gears is made by removing the belly pan, held on with two screws.
You may want to fashion some sort of cradle to hold the engine steady while you work.
Access to the gears is made by removing the belly pan, held on with two screws.
You may want to fashion some sort of cradle to hold the engine steady while you work.
Be very careful when doing this, as those tiny gears and wheels like to leap out. The copper contacts that touch some or all of wheels are spring-loaded; if you are dumb enough to remove one of those wheelsets (I speak from experience), you'll need to pinch the copper contacts against the chassis with a pair of tweezers in order to get the wheelset back on.
The leading and trailing wheel trucks (if any) are also held on with these screws.
If, after removing the screws and belly pan, the trucks fall off, don't worry about them right now.
It's usually not necessary to remove all the gears and clean them until they shine.
If either (or both) of the leading or trailing wheel trucks fell off in step #1, hold the belly pan firmly against the chassis with one hand, and carefully insert them with the other.
Put both of the screws back in when everything is in place.
Give it a gentle push if it doesn't move. If that doesn't do it, your last resort is to stick a Q-tip or toothpick in the motor armature to coax it to turn. Be careful not to damage the motor windings if you do this. Once it rolls over a few times, it should spin freely.
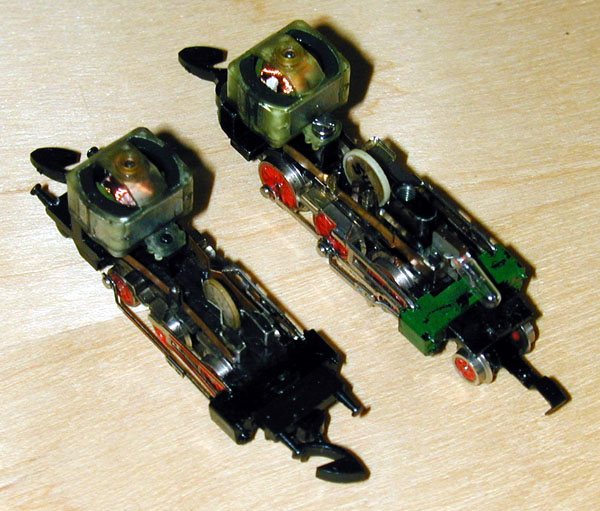 Most of what applies to "Big Steam Engines," above, applies to these, the smallest Marklin locomotives.
The exceptions follow:
Most of what applies to "Big Steam Engines," above, applies to these, the smallest Marklin locomotives.
The exceptions follow:
You can check if the pushrods are the problem by removing them; gently pull out the tiny pins in the driving wheels with a small pair of plyers to remove them. If this solves the problem, then you've got to disassemble and then reassemble the internal gearing until everything lines up.
ODD-BALL LOCOMOTIVES
The odd-balls are my favorites.
Here are some examples:
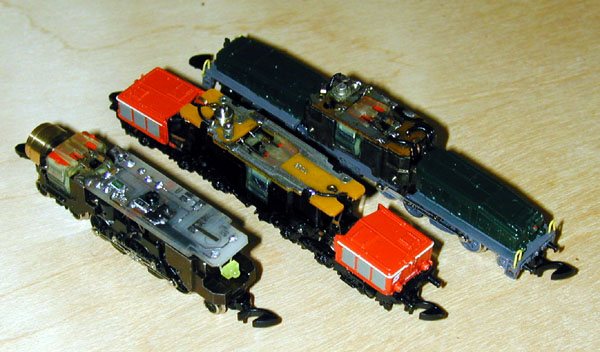 The Swiss Crocodile (Marklin 8856 / 8852 / 8114) is the platypus of model railroading.
The main frame is like most other electric locomotives, with a centrally-mounted motor, a circuit board on top, and two pivoting trucks.
Each truck, on the other hand, is somewhat like a steam locomotive chassis; a long, rigid line of wheels, pushrods, and a pair of leading/trailing wheels.
For cleaning and lubricating, however, the "Big Diesels and Electrics" section is applicable.
The Swiss Crocodile (Marklin 8856 / 8852 / 8114) is the platypus of model railroading.
The main frame is like most other electric locomotives, with a centrally-mounted motor, a circuit board on top, and two pivoting trucks.
Each truck, on the other hand, is somewhat like a steam locomotive chassis; a long, rigid line of wheels, pushrods, and a pair of leading/trailing wheels.
For cleaning and lubricating, however, the "Big Diesels and Electrics" section is applicable.
What sets Crocs apart from all others is that the trucks are connected to the main frame electrically with wires instead of copper contacts.
This is important because the most common cause of problems with Crocodiles (both Swiss and German) is that these wires can break or become disconnected from the trucks or circuit board.
 Making repairs to the wiring on a Croc involves resoldering.
This can be difficult, because of the small size, and the six different wires (three per truck) required to pass power to the motor and back to the lights.
The photo points out the solder points - just match up the numbers to correctly wire the unit.
For example, (6) gets connected to (6).
Note that some points, (3) and (5), have two solder points on the trucks - they're simply connected to each other.
Making repairs to the wiring on a Croc involves resoldering.
This can be difficult, because of the small size, and the six different wires (three per truck) required to pass power to the motor and back to the lights.
The photo points out the solder points - just match up the numbers to correctly wire the unit.
For example, (6) gets connected to (6).
Note that some points, (3) and (5), have two solder points on the trucks - they're simply connected to each other.
Hint: some of the wires are fed under the circuit board and through the opening in the middle.
There's very little clearance under the main shell; you'll have to carefully pack the wires so that the shell fits snugly.
If you can't get the shell to fit cleanly, you may have to move more wires under the circuit board.
Because the axles are mounted quite loosely, this unit typically has excellent power pickup. Also, this is probably the fastest engine Marklin has produced for Z-scale - well oiled, it will rip down your track.
The most common problem with this railcar is probably the noise made by the spinning propeller. This can be treated with a little oil on the propeller gear and the two brass bushings that hold the propeller axle. Gently loosening the screws that hold on the body will also reduce the noise.
Instead of trying to remove the circuit board and upper frame (which can be a chore), you can actually just remove the wheels by popping out the two plastic inserts from the bottom of the unit with a small screwdriver. Once the plastic inserts are removed, the wheelsets and a pair of spur gears can be pulled out. Clean and oil the wheels and gears thoroughly at this point. Using a pair of tweezers, remove any gunk from the gears and copper contacts in the chassis. Then, use a Q-tip and some alcohol to clean the copper contacts. Reinsert the gears and wheels, and reattach the plastic inserts when you're done.
Wheel Cleaners
In all the talk of cleaning track, I didn't want to neglect the cleaning of locomotive wheels (drivers). The dirt, grime, oil, and dust that seams to magically coat all your track will also get picked up by the wheels. If that weren't enough, the flow of electricity can help bake the grime on the wheels - the Relco units only make this worse.
A common symptom of dirty wheels is a very jumpy locomotive. Even after you clean the track, an engine with dirty wheels will appear to skip down the track, never running smoothly for more than a second. Luckily, this one is really easy to fix, and I've tried two products that do the job (others, listed subsequently, I haven't yet tried).
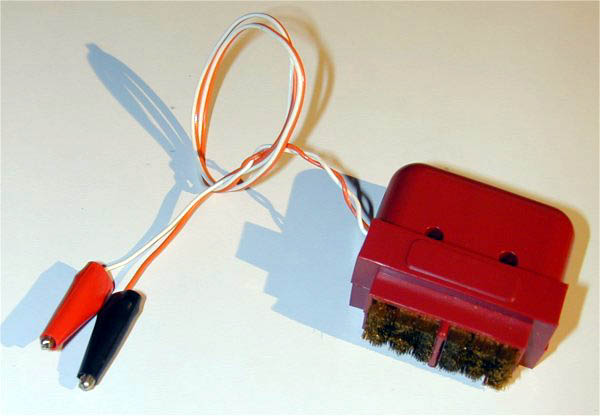
Micro-Trains #236 Driver Brush
The Micro-Trains #236 driver brush (~$8.00) is a device with two brass brushes. The brushes are electrically isolated, and connected with wires to two alligator clips. (The MTL #236 actually comes with three clips, but the third - the one with the brown wire - is not needed for Z, and can be removed.)
To clean a locomotive, hook the alligator clips to the rail power terminals on your power pack, and turn the throttle all the way up. (You can also hook up the clips to any two powered rails, but they can damage the fragile Z rails if you're not careful.) Gently press the locomotive up against the brushes, keeping the plastic isolator lined up between the left and right sides. The brushes simultaneously power the motor and clean the wheels. Move the engine back and forth while the wheels spin; turn it around, and do it again.
Note: the Minitrix 66623, next, is more expensive, but easier to use and does a better job. However, it needs minor modification to work with Z-scale.
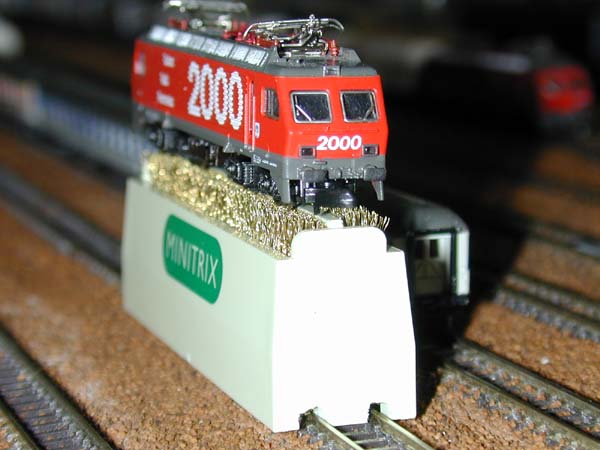
Minitrix 66623 Wheel Cleaner
The Minitrix 66623 wheel cleaner (~$15.00), while similar to the Micro-Trains unit (above), is much longer, a little more expensive, and does away with the wires. Instead, you lay it directly on a section of straight track (it must be slightly modified to fit on Z track) and then place the locomotive on top.
Unlike the Micro-Trains cleaner, the brushes are long enough for any Z-scale locomotive, which makes cleaning much quicker and easier.
The biggest problem is that it is designed for N-scale, and therefore must be modified to fit on Z-scale track. It's an easy process, but it would've been nice if Trix (a subsidiary of Marklin) would've made a slight adjustment to the design to accommodate both gauges.
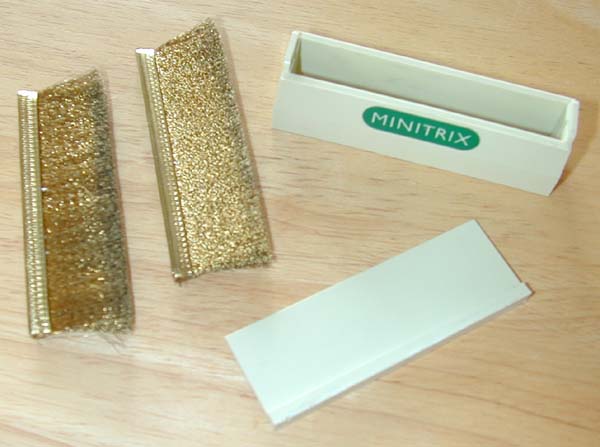
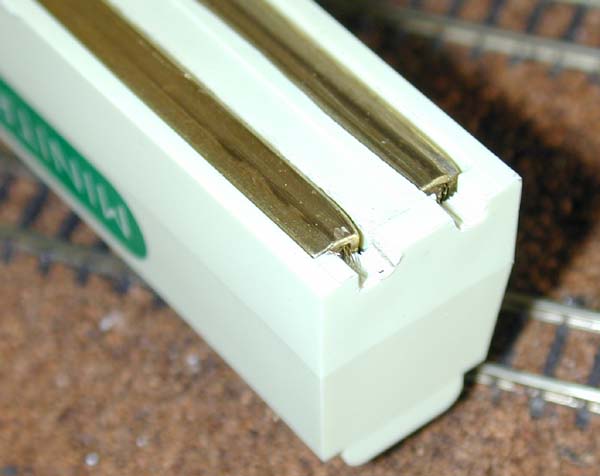
Here's how to modify the Trix 66623 so that it will work on Z (and Nn3) track:
Start by removing the plastic center divider by pulling it out the bottom. (This will also release the brushes from the shell.)
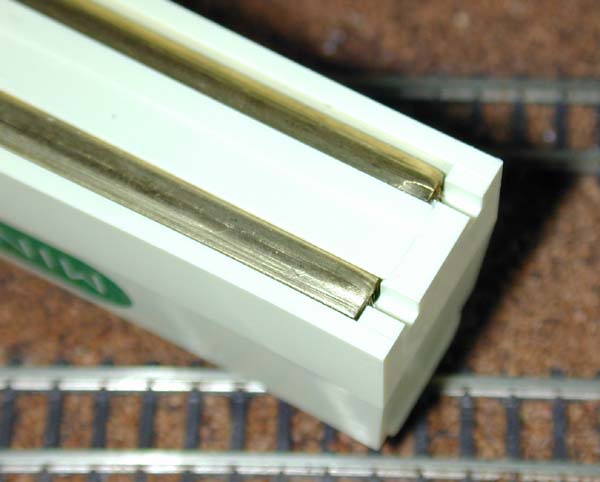
First, trim the wide end of the "T"-shaped divider so that it is about 3/6" (~5mm) wide. Then, widen the four little rail slots in the shell so that it fits comfortably on a section of straight Z track.
When you're done, re-insert the two brushes into the top, and then squeeze in the divider from the bottom. Test-fit the cleaner on the track; you may have to make a few adjustments so that it sits level and the brushes make contact with the rails and, simultaneously, with the wheels of any locomotive placed on top. It's just a pressure fit, so you can move things around with a screw driver (gently) until everything is properly lined up.
The finished cleaner. Although originally designed for N-scale, you'll find the brushes to be perfectly aligned and sized for Z-scale engines.
Note: After using either this or the aforementioned Micro-Trains #236 driver brush, your wheels will shine, and your locomotive will run like new. Of the two, the Minitrix cleaner does a better job of cleaning the wheels and does it in less time with less fuss. The Micro-Trains unit is cheaper, and works with any scale from Z to HO without modification.
Tip: After use, any brush-based wheel cleaner will begin to turn black from all the grime it has collected. To clean the cleaner, just use warm water, dishwashing detergent, and an old toothbrush as needed.
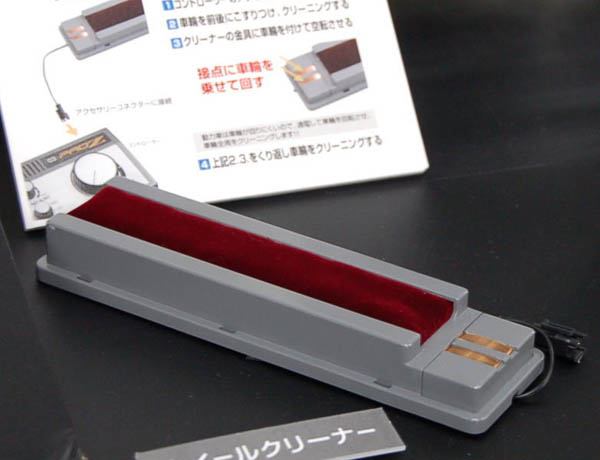
Pro-Z Wheel Cleaner
The Pro-Z wheel cleaner by Tokyo Marui is designed to plug into Pro-Z's power pack. Two copper contacts power the motor through at least two driving wheels, while the rest of the drivers are cleaned by the red pad; turn the locomotive 180 degrees to complete cleaning.
ZTrains Homemade Locomotive Wheel Cleaner
John Cubbin has come up with a very innovative homemade locomotive wheel cleaner, based on alcohol-saturated facial cleansing pads instead of brushes. Details and photos can be found at Ztrains.com.
Rodney's Railroad Tools Wheel Cleaner
Rodney's Railroad Tools makes a nifty z-scale wheel cleaner built into a piece of track that can be mounted on your layout.
Return Home | Search | Contact Me
Copyright © 2000-2010 D. A. Karp. All rights reserved.